Yesterday I said I was going to show you more details on my psyduck and water nails so here we go. This is my first tutorial so please let me know if you have any suggestions or comments.
First I applied 1 coat of Sally Hansen Hardener as a base coat. Then I started with one coat of Zoya Pippa on my thumb, and 1 coat of Sinful Colors Cinderella on the remaining nails. You can see here just how sheer Cinderella is! Please pardon the redness on my nails, Essie Wicked really stained and did not want to be removed!
Meanwhile, on the other hand I repeated this process but I used Julep Jessica in place of Pippa. I do want to mention that these are Psyduck's beak colors.
I forgot Jessica bubbles up on me :(
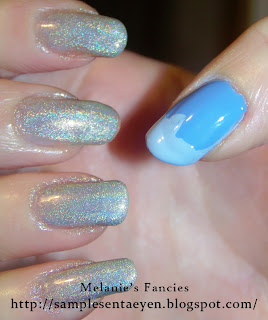
Next is one of the reasons I'm showing you the step by step. I let these dry a little bit.Then I applied 1 coat of Sally Hansen Nail Prisms Diamond over Cinderella. On the Psyduck nail, I applied 1 coat LA Colors Shock, leaving a little bit of room on the tip. Then I just painted the tip using Pippa again, and added a little triangular shape at the top of his beak.
Meanwhile, on the otherhand I repeated the process except I used a Simple Pleasures polish and Jessica.
Here's another look at the holo prettiness that is Diamond!
Now for the fun part! Salt time!
I let this coat sit for a few minutes to dry. Then I got started on my salt nails.
First I applied 1 coat of Zoya Opal on 1 nail.
Without waiting for Opal to dry, I quickly poured on some of the Kosher salt. Again, you could use regular table salt. I just used Kosher salt because I wanted it to look like small rocks on my nails. After applying the salt, I just simply brushed off any salt which was on my cuticles. I then applied one coat of my Fantasy Fire dupe.
Repeat on each nail!
You could easily just finish off this look by applying top coat, but because I wanted it to look like this was underneath water, I applied 1 more coat of Opal, and then 1 coat Barielle No Chip Speed Dry Top Coat.
One more thing about this manicure. I know it looks really lumpy and rough, but after applying 1 coat of top coat, it really isn't too terrible. Here's a side view so you can see.
To finish off my Psyducks, I just used Kiss Nail Art in black to draw on some nostrils, and the little tuff of hair on its head. I used Sally Hansen White Tip to draw on the eyes, and then used the Kiss black to finish off the eyes. I let these both dry really well before applying top coat but the black still managed to smear a bunch on the regular Psyduck :(
I will leave you with one last look at the final manicure. This was a lot of fun to do, and if you haven't tried this look out yet you definitely should! You can really do some cool things with it. Thanks for reading and I hope you enjoyed this manicure as much as I did!


I want this on my hands so bad right now. Thanks for the tutorial! All those colours really add more and more cool effects!
ReplyDelete