Thursday, June 27, 2013

Review: KKCenterHk N.NAIL 2.5mm Circle Glitter-Green Sea Green [NNAIL-HS728A-2-5mm]

This post contains a product sample.

There's nothing I like less than doing a product review of a product I hate. Unfortunately I have a doozy of one to share with you today. Ironically, I was doing this manicure in support of National Post Traumatic Stress Disorder Awareness Month which is also in June. I completely forgot about that, so I suppose next year I will blog about that topic more along with headaches. Anyway, I say it's ironic because boy was working with the glitter traumatic.

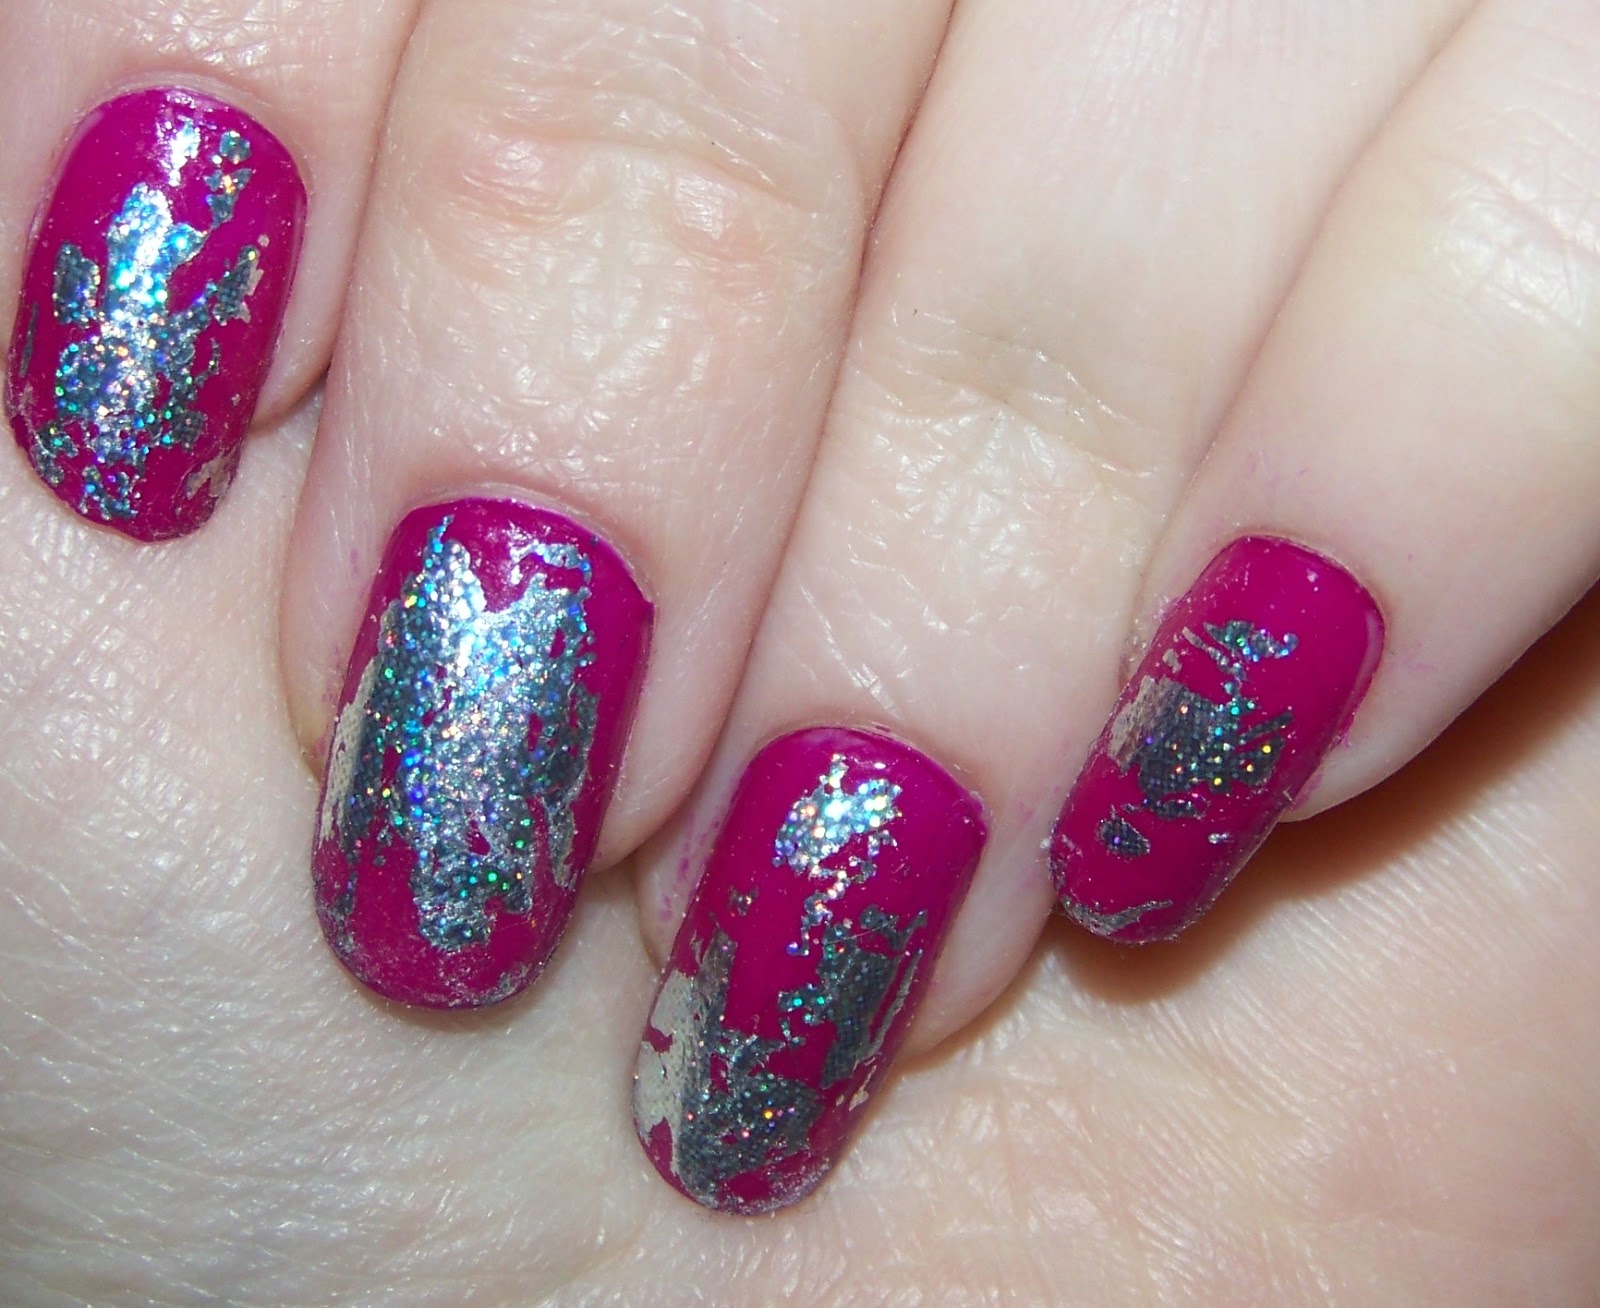
Today I have NNAIL-HS728A-2-5mm to show you. KKCenterHk sells this for $8 for 10 grams of sea green circular 2.5mm glitter. Before I show you my full manicure picture, let me show you pictures of the aftermath.


This glitter is awful because it bleeds with top coat. So I thought to myself, OK, I won't use topcoat. I applied 3 coats of Sinful Colors Toyko Pearl and then just pressed some of the glitters on to my nails. As you can see from the pictures, by the next day most of the glitter had already come off, or the color itself had come off. Traces of color were left on some parts of my nails. Where the glitter didn't fall of on it's own, it stuck to my nails and was pretty difficult to remove. I couldn't win either way!


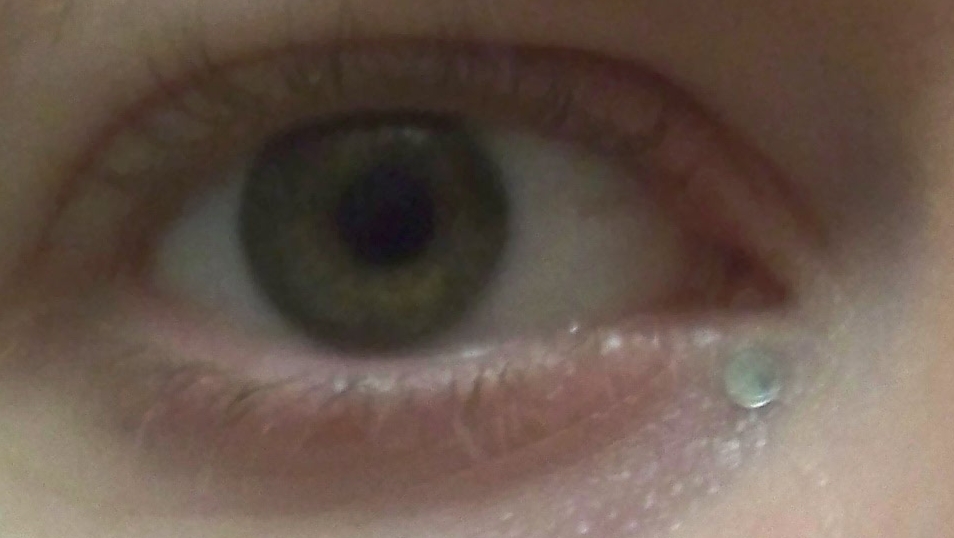
I also want to say this glitter is a bit dangerous and I'm not trying to be over dramatic but as you can see, some of the glitter got itself stuck right under my eye. I kept wondering why my eye was hurting and then I looked in the mirror.


So not only can I pretty much not use this on my nails, but nor do I really want to. I did try using it in a franken. The good news is I made a really gorgeous franken, but the glitter started to melt and of course bleed. I really have no idea what I'm going to do with the rest of the glitter at this point in time. Save it for some crafts? I hate to just waste anything but I've thought about just tossing it.

 (my franken - pretty! hope to do a full manicure with it soon :) )

Here's what I was trying to go for with my manicure. I used Pure Ice Champagne on the accents. Too bad this turned out so awful because I thought it was a really cute idea!

(I specifically marked this last picture so anyone seeing this picture on the web can find my review & read it.)

So it stinks that this was such a let down.. but KKCenterHK does have a ton of other great products!

 
website: http://www.kkcenterhk.com
Blog: http://kkcenterhk.blogspot.com/
Tumblr: http://kkcenterhk.tumblr.com/
Facebook: KKCenterHK
Google+: 108172894204617826877
Youtube: wwwkkcenterhkcom
Twitter: @kkcenterhkcom
Weibo: kkcenterhk


Use code GETFANCY at checkout for a 10% discount.
Offer valid through January 31, 2014
(this is NOT an affiliate link)


Wednesday, June 26, 2013

Review: KKCenterHk N.NAIL Silver Glitter Hidden Patten Nail Foil Transfer [NNAIL-E19]

This post contains a press sample.

Today I have a pretty cool product to share with you, from KKCenterHk. Today I'm showing you N.NAIL Silver Glitter Hidden Patten Nail Foil Transfer [NNAIL-E19]. This is nail foil which can be transferred to your nail.  

Here is shown the container of foil next to a bottle of their glue which they also sent me to try out. To use this product, basically you're supposed to do your manicure as normal: basecoat, polish, etc. Let it dry, then apply a coat of the glue to your nail, cut out a strip of the foil, and press it gently to your nail for a few seconds. Then you lift the foil and wallah! the foil is transferred.

Here is shown 1 strip of the foil next to a dime. I used this ONE foil on all 10 of my nails and as you can see, I had a ton of the foil left over! Woohoo! Excellent, because this sells in lengths of 59 inches! Lots of leftovers to use.

Now let me talk about the glue for a minute. The glue itself is awful for this and I will be saving it for something else more practical, although what I'm not sure at the moment. The problem with the glue is that it never dried. So while the foil stuck to my nails, so did everything else. Nails full of hair, lint, etc. did not make me happy. Fortunately, I was able to remove the whole thing just with hot water.

Update:  It turns out I was not using the glue correctly. When used correctly, it does work much better although there is still some gumminess with fuzz and whatnot sticking to my nails a tiny little bit. My apologies to KKCenterHk.

Shown here with 2 coats of Sinful Colors Dream On. I used this polish in honor of National Headache Awareness Month. The name seemed fitting, even if the color is more raspberry than lavender :) Anyway, the picture on the right was taken the same day I tried using the foil with the glue.


The next day I decided to do a gradient with Dream On and Kleancolor Neon Purple. I just used a sponge to do the gradient and I gotta say I love this look so I'll be doing more gradients in the future. I think applied 1 coat of top coat over the nails, let it sit for a little bit and started applying the foil.

 While this nail foil was a lot of fun to work with and I do love how it turned out, there are a few problems with it. You cannot use top coat over top of it at all. The top coat gets rid of the rainbow holo effect and makes it look like flat foil. Interesting, but boring.
Since you can't use top coat with this, it doesn't last too long. After a day of chores, most of the foil had worn away. Several days later I did still have a little bit of the foil on my nails but not enough to look like I had done it on purpose.

(Here's a shot in the shade. It does look pretty cool!)

Even though it didn't last long, this was a lot of fun to work with and I do like the product. It's a great way to spice up an old manicure because you can use it to hide mistakes or worn away tips. Definitely a great product for something you'd want to wear to a party or other temporary means. I probably will be using this a lot more in the future when I'm just not in the mood for crackle... I just won't be using the glue!

Thanks to KKCenterHk for providing me with this sample.


Use code GETFANCY at checkout for a 10% discount.
Offer valid through January 31, 2014
(this is NOT an affiliate link)

Saturday, June 22, 2013

What I wore for Sidney..

This post contains a press sample.

 Somehow it's been a week already since Sidney died, and I woke up this morning crying and thinking about him. I still miss him terribly, but I still feel a ton of guilt and worry over thinking that I may have done something wrong. Rationally I know that he was old, and that he also showed signs of kidney failure before he even came into our home but that really doesn't help.

So anyway, on that note I have one last manicure to show you today featuring Jior Couture Vét Olografik and this is the manicure I did just after Sidney passed. In his honor, I took Kleancolor Black and painted over all of my nails black, let them dry a tiny bit and then used some polish remover to get an acid wash look.


I really loved how this turned out. I know some people may not be fond of the acid wash look, but it's still one of my favorites to do!

In regards to the pigment issue, Sacha wrote me back and I wanted to share what she wrote with you all:

"I'm sorry the application of Vet olografik was not smooth.
I will look into it, I believe it was the the new pigment. I truly apologize for you getting a bad lacquer.  I try my very best to put out the best and it displeases me for anyone to receive a bad lacquer.
I appreciate the honest review as this helps me move forward to create better products."

She also asked me to review for her again, yay!!! I'm looking forward to it. Thanks Sacha!

Friday, June 21, 2013

Nail Art with Jior Couture: Spun Sugar

This post contains a press sample.

 Yesterday I showed you my Jior Couture Vét Olografik review but I did want to show off a couple more pictures. I just don't like having solid color nails so I did some nail art with my manicure as well.

A couple of weeks ago, my friend Tara shared a picture of Spun Sugar nails on my Facebook page and suggested I try out this technique. That's a technique I had never done before so I thought I'd give it a try, and I just new black would look awesome with this polish! I used LA Colors Circuit for the spun sugar. I matted the accent nail because I discovered top coat really makes it smear if you don't let it dry. Mike & I both liked this look so I just went with it for the accent. I did pretty thin spun "sugar" so there isn't a great deal of it, but I think it turned out pretty neat. I used NYC Matte Me Crazy on the accent.


I'm goofy, so I completely forgot I actually do have other black nail polish other than Circuit. Next time I'll probably use a different polish, as this was a bit difficult to work with.

This method was a lot of fun to do, but since you can't really clear it without messing it up too much (AKA you can - you just have to wait and I'm impatient) this didn't last me long. The next day it had pretty much all come off. So I decided to do more nail art, which I will show you tomorrow!!

In the meantime, go check out Jior Couture's beautiful polishes :)

Oops, almost forgot! I felt bad yesterday about not having a black light photo for you so I quickly swatched my thumb and tried it out in the black light. Yes, it certainly does glow under black light! I'd say this is one of my best glowing polishes.


Thursday, June 20, 2013

Jior Couture Vét Olografik

Press sample.

Warning: Lots of photos!

Today I have a polish from an indie company called Jior Couture to share with you. Vét Olografik is a green holo polish from the Hispaniola Summer Love collection.

Let me show you the packaging since this seems to be so important to a lot of people. I think it was nicely done.


 In addition to Vét Olografik, Sacha provided me with a base coat and top coat to try out which I felt was pretty generous of her. I was very impressed with these. I had no problems with the base coat and the top coat dried very quickly, faster than some of my fast drying top coats!


Vét Olografik is a really gorgeous green scattered holo. I definitely did not have anything else like it in my collection so I'm delighted to add this beauty. The formula was a little tricky to work with because I did have quite a few clumps of pigment. Holding the bottle upside down for a few minutes, and rolling it on its side did help but it didn't get rid of all of the clumps. Fortunately after 2 coats of Vét Olografik and 1 coat of the top coat, the majority of the pigment is barely noticeable.

I used the Jior Couture top coat on all nails except for the accents, which I used NYC Matte Me Crazy just to see how this looked matted. 

edit: I forgot to mention, I did get a bit "smurfed" when removing this, but simply using acetone and working quickly to remove it was enough to keep from getting stained. 

Flash photos: 


You can see here a little bit of a clump on my ring finger, but no big deal. You can also see this polish is fairly sheer.

Indoors, no flash: 

 Sorry for the blurry nature of this photo. It's the only photo I have which shows just how much darker this polish is in lower light conditions. It is a very pretty grassy green in low light.

Outdoors photos:


Yes I took a lot of photos.. I hope you can see how pretty this polish is! I don't think Jior Couture gets nearly enough attention. I really hope I get the chance to review more of their polishes.

The Hispaniola Summer Love polishes glow under black light! Unfortunately, with everything going on with Sidney, I completely forgot that so I don't have any pictures for you. I will definitely do something with this polish again soon and get some black light photos to show you. In the meantime, I'll have some nail art pictures to share in my next post or two!

Jior Couture polishes are available for $3.50 - $4 for .17 fl/oz 5mL. Some of the Hispaniola Summer Love polishes are still available, as are some sweet treats in her Bakery and Drink Bar collections. Some of those colors look awfully pretty!

Thanks to Sacha for providing me with these samples.

What do you think of Vét Olografik? Have you tried Jior Couture?

edit:

In regards to the pigment issue, Sacha wrote me back and I wanted to share what she wrote with you all:

"I'm sorry the application of Vet olografik was not smooth.
I will look into it, I believe it was the the new pigment. I truly apologize for you getting a bad lacquer.  I try my very best to put out the best and it displeases me for anyone to receive a bad lacquer.
I appreciate the honest review as this helps me move forward to create better products."

Monday, June 17, 2013

I'm angry.

I have nothing to disclose, blah blah blah :P

I haven't posted anything in a week and here's why.  On June 1st, we got our cat Sidney. For the past week, he's been pretty sick and I've been dealing with taking care of him and trying to get him better. I barely slept at all this past week. Finally, Saturday he died. Fortunately he passed away quietly and hopefully with no pain but knowing he was loved.

I'm sad, hurt, lonely and angry. We literally only had him for 2 weeks. We don't know for certain exactly how old he was, but he died having lived a long life. I'm just so angry that I've been wanting a cat for so many years and we finally get one and this happens. I just want my happy, playful, friendly fat cat back. He was one of the friendliest, nicest cats I've had and I'm heartbroken that I didn't have more time with him.

I'm REALLY struggling not to be depressed right now. It's really easy when these types of things happen.. the problem with my medical problems is that I struggle all the time just for a little piece of normalcy and it always seems like whenever I'm happy for just a little while, it gets taken away from me. I really thought things were going to change for once. I suppose things have, because in part this has inspired us to do just about anything to get out of our apartment and find a new place to live as soon as possible. Fortunately, Sidney taught me an invaluable lesson: I need to stop telling myself I can't. I can do just about anything as long as I put my mind to it. I finally realized that it really doesn't matter if I'm in complete agony all the time - if I'm going to be miserable, I might as well be doing something to help improve my life or I might as well be hanging out with family instead of just sitting in my house all alone. Either way I'm going to be miserable, but at least with being with family I won't be alone which makes things even worse. Thank you Sidney for helping me figure out how to get some of my life back.


Rest in peace now, little Sidney. I love you and miss you very much!

So anyway, that's what's going on with me... I do have a ton of nail stuff to review over the next few weeks and I should be getting more some time this week, yay!

Thanks for reading :)

Monday, June 10, 2013

Pretty & Polished Strawberry Shortcake Sugar Scrub

This post contains a press sample.

I recently signed up to receive samples from Pretty & Polished, as I've been eyeballing their polishes for what - a year now? Last week I was given the chance to try out one of their products and I was very excited to receive a sugar scrub!  To be perfectly honest I'm not very familiar with sugar scrubs, this is only the second one I've ever used but I will try to be fair in my review.


 (Photo provided by Pretty & Polished.)

I was provided with the Strawberry Shortcake sugar scrub, which is available in 4 ounces for $6 or 8 ounces for $10.  I was provided with a small sample which I was able to use twice. The smell is absolutely wonderful and reminded my boyfriend and I of strawberry ice cream. Yum yum! It isn't a very strong fragrance, but considering I've had a migraine for about a week now I greatly appreciate that. For me, the scent is just right - not too strong but not too weak.

  (Photo provided by Pretty & Polished.)

I do have pretty sensitive skin, so I'm always a little nervous before trying out a new skin product. I was delighted that I didn't have any problems with this at all! Quite the opposite - I noticed after one use my skin felt noticeably softer, and I do believe it's a bit smoother as well.
 (Photo provided by Pretty & Polished.)

I feel this is a good product, and the price seems to be pretty typical for sugar scrubs. It's definitely a fun way to do something special to treat yourself. If you're not crazy about the smell of strawberries, it comes in other scents such as Candied Cherries, Blue Raspberry and Coffee Junkies. P&P also sells bath bombs, cuticle balms, lotion and more... and of course nail polish!

My thanks to Chels for allowing me to review this product. You can find P&P products in their online shop: 
Also check out their Facebook page for updates and swatches of their pretty polishes!

Saturday, June 8, 2013

KKCenterHK NNAIL-Mix-Star-2-5mm Glitter!

This post contains a press sample.

I have another KKCenterHk review for you today, and this one is loose glitter! Such fun. I have a few samples from them to try out, but I decided to start with the Mix Star glitter and just do something sort of random. When I was thinking of stars, I kept thinking about the balls you typically see in cartoons about the circus, such as this one:


 I also was reminded of being little, and going to places such as the zoo and Sea World, and always wanting these balloons with stars on them. I remember at the time, those balloons were just the coolest thing ever! I remember just being fascinated with those star balloons, and not having any idea of how they made them. Oh, I wish things were that simple these days!

So anyway, for this manicure I just used 1 coat Sally Hansen Hardener as my base, and 2 coats Sation Queenie in a Bottle. Then I just randomly placed the stars on each nail using tweezers and my fingers, then quickly applied top coat. I used NYC Matte Me Crazy on the accent nails, and for the rest of the nails I used Tip Top top coat. 1 coat of top coat wasn't quite enough, so then I applied 1 more coat of Matte Me Crazy, then I turned to Seche Vite for my remaining nails. I do like a lot of top coat on my nails because I prefer a smooth coat. Even with that much clear on my nails, the glitter still managed to snag a little bit.


Let me talk about the glitter itself for a minute. For $8 you get 10 grams of 2.5mm mixed star glitter. The glitter is a bit iridescent so some of it has a bit of a holo effect which is really pretty. Even with matte top coat it still looks pretty metallic. Very pretty.


Please pardon the blurry picture, but I wanted to get a close up of this nail as best I could. The only real problem I had with these glitters is that the blue did bleed a little bit which hopefully you can see here.


 This glitter was a great way to add some sparkle to my nails, and to just do something really simple without a lot of work. I'm sure I'll be using this glitter a lot more in the future!


I'd love to read your comments! Please let me know what you think of this manicure or if you have any questions about this glitter, I'll be sure to answer as best as I can :)


Use code GETFANCY at checkout for a 10% discount.
Offer valid through January 31, 2014